
Using a Sine Systems, Inc RFC-1/B Remote Facilities Controller and want to collect the information on your computer?
Here is one solution.
GetTelemetry will allow you to collect data from your remote site automatically, and do control functions with the click of a mouse.
The software will even help you set up your programming for the RFC-1/B.
The software will sample up to 64 channels, display up to 16 samples (of your choice) on the screen and web page, and log the all the collected samples to a file. The previous days data file can be emailed to you automatically at the end of the day (requires a full time or on demand connection to the internet). You can setup the program to access up to 9 different sites (only the current site is sampled automatically. Sampling multiple sites automatically will be in a future version). There is also a graphing function in the program so you can plot two samples to look for trends in your data.
Requirements:
First and foremost if you are setting this up for the fist time, DO NOT pick a site in the middle of nowhere. You may have to make a couple of trips to get it all working if you have problems with the modems. But once it is setup correctly you won't have to mess with it again.
For Modem to Modem Connection:
You must have a Sine Systems RFC-1/B version 3.02 or greater and firmware version 5.10 or greater. You will need two modems, one for the RFC-1/B and one for the computer. You will need to have the RS-232 or Modem option for the RFC-1/B or the MA-2 Modem Adapter. And you need at least a Pentium® 233mhz computer with 64mb of ram and 500mb of disk running windows ® 98/98se/XP (it should work with 95 but it hasn't been tested, it has not been tested under 2000, or NT, good luck with Windows Me).
If you use an external modem for the RFC-1/B you will need a Male to Female Straight Through cable (NOT A NUL MODEM CABLE) with the correct ends (depends on the version of RS-232/Modem adapter you have on your RFC-1/B) and an EXTERNAL "AT" command set compatible modem that has to be setup for 2400 baud (1200 or 300 are also possible). It is best to check out the modems using two computers sitting next to each other if you can. Make sure the modem for the computer dials out (you can use any communications program to test it or even the GetTelemetry program just set the telephone number to the number the other modem is hooked to). And make sure that the modem for the RFC-1/B is setup to send TEXT (or VERBOSE) responses (usually ATE1V1Q0S0=0 is the correct setup). When you have the GetTelemetry computer dial the second computer should show messages such as "RING". Just type in ATA and the modem should answer and connect to the other modem. Make sure you get a "CONNECT" message on the modem that will be hooked to the RFC/1B. If you get a Connect message with a additional information (CONNECT 2400/LAPM/MNP) it could cause the RFC/1B to hang up. Use X0 or X1 to get the correct message. If all this works you're on your way. Remember to save the settings on the remote modem with an AT&W0 command so the modem will remember it's setup.
The RFC-1/B needs to be setup for Voice then Data (set memory location #1002 to 2), 10 Second time out seems to work the best (memory location 1016 set to 1), 2400 baud (memory location 1005 set to 2) don't bother with higher baud rates it wont work.
In the GetTelemetry program:
Goto the Setup menu and select Communications
You will be asked for a password, the default password is 4150.
On the page that displays there is a field labeled Modem Device. Select
your modem here.
If the phone line your modem dials out on requires a prefix code (say 9
for an out side line) add it to the begining of the phone number shown.
Now click the Configure button next to the Modem Device field, a new page
will come up.
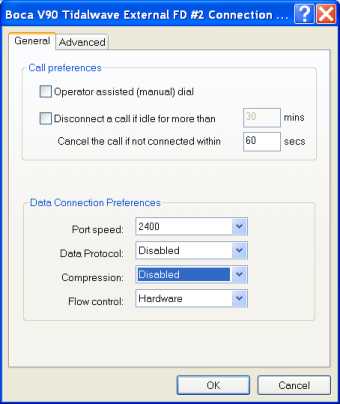
On the General tab make sure the Port Speed is set to 2400, the Data Protocol
is Disabled, Compression is Disabled, Flow Control is set to Hardware, and
the two check boxes are UNCHECKED.
Now goto the Advanced tab, make sure the two checkboxes are UNCHECKED, Data
bits is set to 8, Parity is set to NONE, Stop Bits is set to 1, and Modulation
is set to Standard.
Click OK,
Click SAVE,
When connecting the modem to the RFC-1/B check to make sure that the serial cable seats solidly into the RFC-1/B's serial connector. Sometimes you have to remove the stand-offs on either side of the RFC-1/B's serial connector to get the cable to seat completely. The cable not being seated can cause intermittent operation of the modem. For more information on the proper setup of the RFC-1/B check the Tech. Notes on Sine Systems, Inc's Web Site.
It is recommended that when you go to the remote site to setup the modem you call into the system after installing the modem and make sure the system can still be accessed via Voice. Also make sure that the modem answers, call the system and then wait without having entered the password, if the system answers with "ENTER" but after about 10 to 15 seconds the modem does not answer then something is not setup correctly. Check the RFC-1/B programming and the cable.
The things that will cause problems at this point are usually setup problems. If you turn off Error Correction on the RFC-1/B modem you MUST turn it off on the computers modem or you will not be able to get the GetTelemetry program to login. GetTelemetry by default shows you a diagnostic screen of the call. This can tell you a lot about what is going wrong.
Direct Serial Connection or TCP/IP Connection:
To connect to the RFC-1/B directly (without a modem) the RFC-1/B must
have a serial adapter and not the built in Modem. You will need a NULL modem
cable with the correct ends for both the RFC-1/B and you computer. You need
to setup the RFC-1/B in Data then Voice mode (Set Memory Address 1002 to
1) set the baud rate to 2400 (set 1005 to 2) and set the Answer Ring Number
to 2 (set 1001 to 2). This is mostly factory default settings. GetTelemetry
will automatically poll the RFC-1/B to get the data based on how you set
up the program. You also need to make sure that the passwords are setup
in the program correctly and that the Site ID phrase is programmed correctly
into the program.
Basic Program Setup:
When setting up GetTelemetry you will be prompted to enter a password. The default passwords are as follows:
| for all setup functions | 4150 | Advanced Programming |
| for all control functions | 66 | Control Password |
| program exit | byebye | |
| for all others (set time) | 4088 | Basic Programming |
The program is designed to be difficult to shutdown, to prevent accidentally exiting the program. The X in the upper right corner of the window will cause the program to MINIMIZE not exit. To exit the program you must go to the FILE menu and select QUIT. The program will ask for a password (if the Program Exit password is set) by default this is "byebye" (without the quotation marks). Passwords are case sensitive.
To setup the program First go to SETUP, COMMUNICATIONS the password is 4150 (Advanced programming password).
On this screen you MUST enter the NAME, MODEM, PHONE NUMBER, LOG DIRECTORY, RFC PASSWORD, SITE ID PHRASE, and TELEMETRY SAMPLE DISPLAY fields.
Enter the Name of the profile (usually this is the call letters of the station), select the modem, enter the number to dial, if you have to dial 9 to get an outside line, enter 9 followed by a comma then the number of the remote site. Fill in the passwords section, the RFC Password is required to be able to access the remote site, and the control password is required to do control functions. If you do not want a password on the Quit option on the FILE menu you must blank out the Program Exit password. Select and EXISTING directory in which to store the log files and configuration information, and enter the channel numbers of the samples you want to display on the screen.
That is all you have to do to get the program setup. The rest of the setup is done as you need it or want to use it.